Author Topic: CT Kitchen Light - Show me yours.  (Read 23355 times)

0 Members and 2 Guests are viewing this topic.

Offline JCAT

  • Hard Floor Camper User
  • *****
  • Posts: 1386
  • Thanked: 32 times
  • Gender: Male
  • Live for today, you may not be here tomorrow.
Re: CT Kitchen Light - Show me yours.
« Reply #25 on: November 15, 2010, 07:25:10 PM »
Matto, I haven't tested the light while camping but it seems to throw out plenty in the garage, right over the kitchen area.

Here are a few more pics. The first is with it sitting in position, showing the angles and lengths of the aluminium.


The second one shows the gap between the two pieces of aluminium and supports.


Closer image of the gap and supports on the upright


Rear support


Close up of rear support. I put this on to stop it bending down further under the weight of the led light.


Extra supports on the front of the bend. (There not very straight)


Bottom support. Will keep it at the correct height.


This is where I store it in the front boot.


I am very happy with it but not having actually used it yet I can't say if I would change anything.

As you can see I used 2 pieces of 20mm x 20mm angle aluminium for the uprights. They are 4mm apart to allow it to slide over the spare wheel carrier, this keeps it vertical.

I cut both pieces with a hacksaw to allow me to bend them at the set height of 35cm.
 
10cm from the bottom I placed another piece of 20mm x 20mm at right angles to hold it at the right height on the back wall of the kitchen.

The length from the bend is approx. 15cm.

The piece across the top that the led is stuck to is 20mm x 3mm aluminium and is 56 cm long.

Hope this all makes sense.
2018 Prado GXL
2017 Vista Crossover XL

Offline Matto

  • Don't Follow Me - I Won't Make It
  • Hard Top Camper User
  • ******
  • Posts: 2322
  • Thanked: 9 times
Re: CT Kitchen Light - Show me yours.
« Reply #26 on: November 16, 2010, 09:05:27 AM »
Thanks JCAT - that is SUPERB!  :cup: :cheers:

Thanks very much!
Matto :)
"I have a bunch of junk that is not any better than yours." - MoGas - ExPo member #226.

Offline Johnno convert

  • Soft Floor Camper User
  • ****
  • Posts: 609
  • Thanked: 2 times
Re: CT Kitchen Light - Show me yours.
« Reply #27 on: March 09, 2011, 01:47:35 PM »
Yes very nice piece of work that. I have been working on ideas for lights for the kitchen too. I have just bought a GU10 led downlight 12v 3w ( I hadn't heard of them either!!) as I have a couple of spare Gu10 downlight fittings and I thought I would try and fabricate something with these. Mind you I have a couple of other ideas on the go too so will see what works the best eh?

Offline hookedon4wding

  • Hard Floor Camper User
  • *****
  • Posts: 819
  • Thanked: 3 times
  • Gender: Male
    • My Videos
Re: CT Kitchen Light - Show me yours.
« Reply #28 on: August 28, 2011, 06:17:00 PM »
Here's my effort.

I've been meaning to fab up a light for the kitchen that we can use with or without the awning up for a while now and finally got a chance to do something about it this weekend.

Main components are led strip lights, square section aluminium from Bunnings with a range of joiners (T's , right angles etc) and a water proof switch.

I wanted it to be easy to setup and free standing. First step was to bolt a T joiner to the back edge of the kitchen. These T joiners are made for permanent connection, which I didn't want at this particular join so I filed down the ridges so I could connect and un-connect the pieces easily when setting up the light.
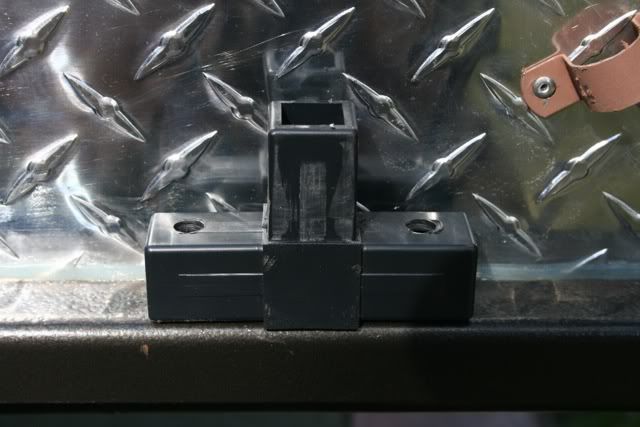


The holes in the top were just so I could get the screw driver through to the bolt head inside the T piece.
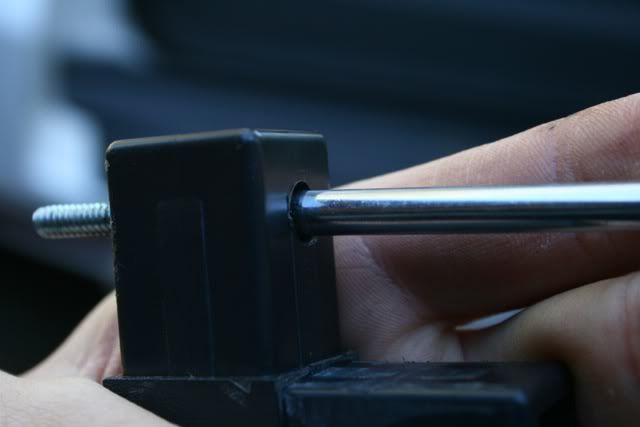


Next was to make up the upright with a short return piece at the top to get the light out over the centre of the stove and bench. The upright slides over the T piece I bolted to the back of the kitchen.
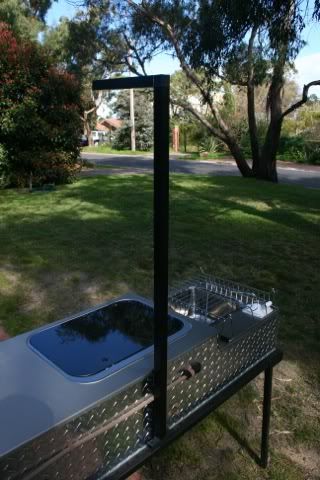


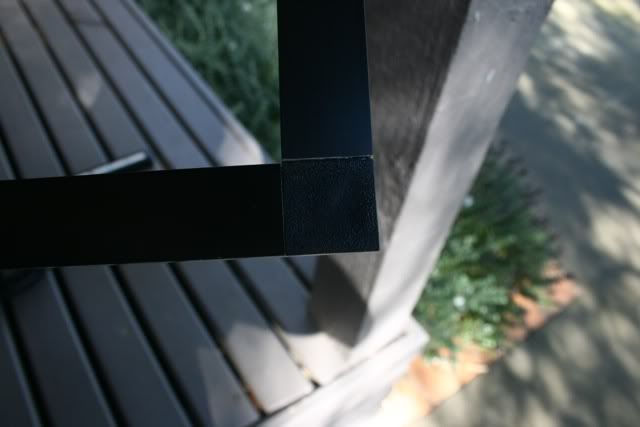
It's just 2 pieces of the aluminium square section joined with a right angle joiner. This bit I wanted to be a permanent join so didn't file the ridges off.


Next was to make up the light bar to attach to the upright. I made this from 2 piece of aluminium square section joined by a T joiner. This means it just slots straight into the upright (again, I filed the ridges down on this connection).
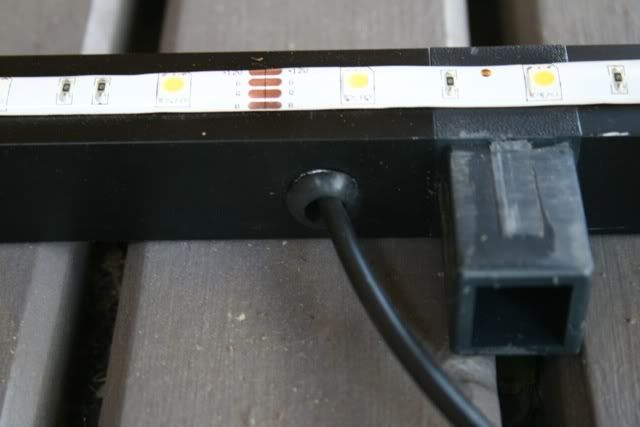


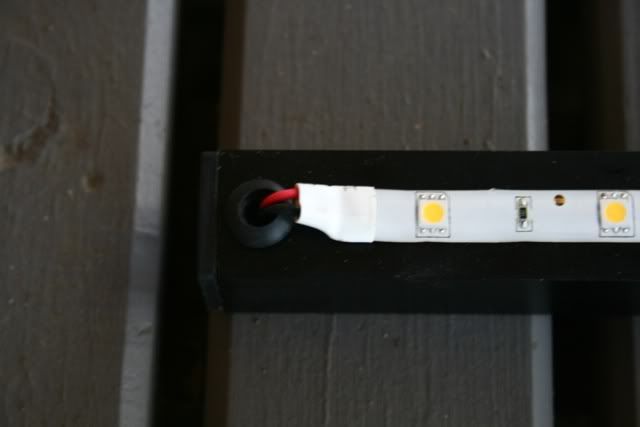
The led strip is stuck to the bottom and wiring runs through a grommet in the end, joins onto a 5m cable, comes out through another grommet in the centre of the bar, through a water proof switch and to a 12v cig plug.
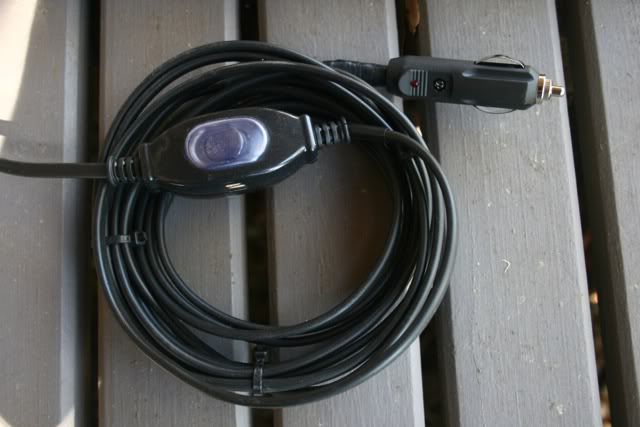


So, the whole thing is just two parts. The light bar, and the upright. The upright slots into the T on the back of the kitchen and the light bar slots into the upright. 15 seconds max to set it up. We'll keep the 2 pieces next to the mattress on the bed base ready to plug in when we setup.
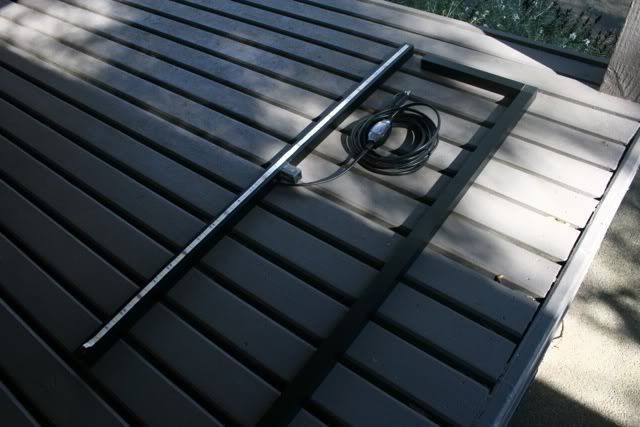
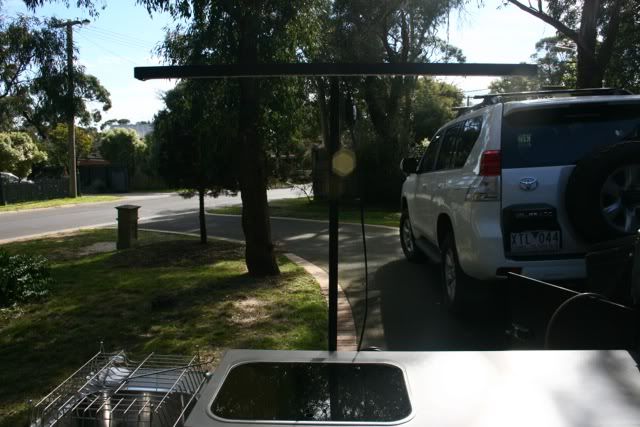
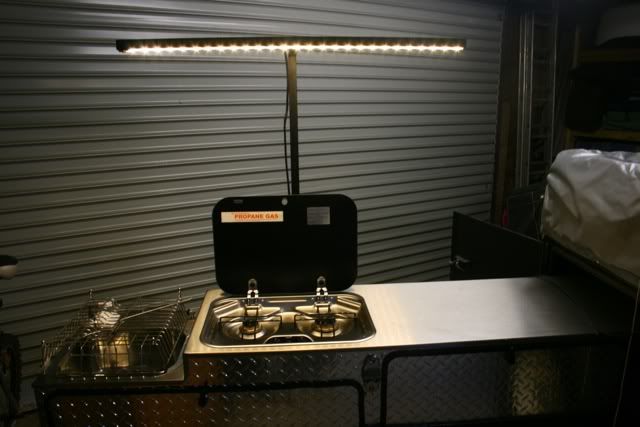
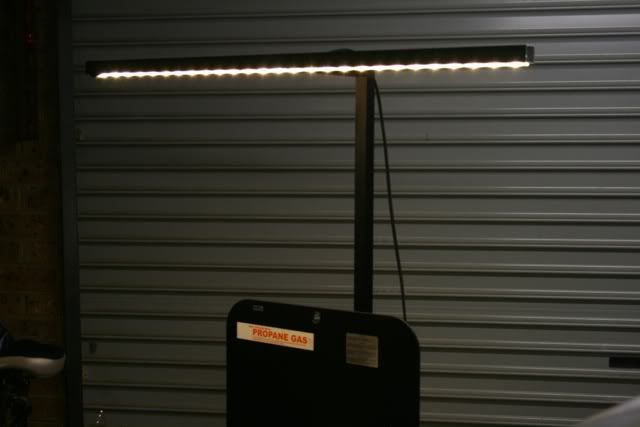


Provides heaps of light right where we need it and doesn't rely on the awning or any poles! Very happy with the end result.

Cheers, Sam.
The following users thanked this post: SimpleSi

Offline D4D

  • Hard Top Camper User
  • ******
  • Posts: 16019
  • Thanked: 391 times
  • Are we there yet?
Re: CT Kitchen Light - Show me yours.
« Reply #29 on: August 28, 2011, 06:26:30 PM »
Very nice and great idea!
I owe, I owe, it’s off to work I go…

Work - Outback
Play - Prado

Offline dooguss

  • Soft Floor Camper User
  • ****
  • Posts: 490
  • Thanked: 3 times
  • Gender: Male
  • Prado Power
Re: CT Kitchen Light - Show me yours.
« Reply #30 on: August 28, 2011, 06:27:42 PM »
hooked on that is a great set up there well done

2006 Toyota Prado
2014 Stoney creek rear fold.

Offline Heiny

  • "All who wander are not lost"
  • Hard Top Camper User
  • ******
  • Posts: 2597
  • Thanked: 1 times
  • Gender: Male
Re: CT Kitchen Light - Show me yours.
« Reply #31 on: August 28, 2011, 06:43:11 PM »
Here's my effort.

I've been meaning to fab up a light for the kitchen that we can use with or without the awning up for a while now and finally got a chance to do something about it this weekend.

Main components are led strip lights, square section aluminium from Bunnings with a range of joiners (T's , right angles etc) and a water proof switch.

I wanted it to be easy to setup and free standing. First step was to bolt a T joiner to the back edge of the kitchen. These T joiners are made for permanent connection, which I didn't want at this particular join so I filed down the ridges so I could connect and un-connect the pieces easily when setting up the light.

Cheers, Sam.
Love it, great idea Sam  :cup:
NM Pajero GLS 3.2 DiD manual
2008 Jayco Flamingo Outback

Offline BJ76

  • Tent User
  • ***
  • Posts: 139
  • Gender: Male
Re: CT Kitchen Light - Show me yours.
« Reply #32 on: August 28, 2011, 09:04:15 PM »
Have to say...  That is one idea I think I will be umm borrowing :)

BJ
2010 Toyota Hilux Dual Cab SR5 TD & Lifestyle Extenda (with a couple of enhancements in mind!)

Offline Dion

  • Hard Floor Camper User
  • *****
  • Posts: 1385
  • Thanked: 4 times
  • Gender: Male
Re: CT Kitchen Light - Show me yours.
« Reply #33 on: August 28, 2011, 10:39:26 PM »
Here's my effort.

I've been meaning to fab up a light for the kitchen that we can use with or without the awning up for a while now and finally got a chance to do something about it this weekend.

Main components are led strip lights, square section aluminium from Bunnings with a range of joiners (T's , right angles etc) and a water proof switch.

I wanted it to be easy to setup and free standing. First step was to bolt a T joiner to the back edge of the kitchen. These T joiners are made for permanent connection, which I didn't want at this particular join so I filed down the ridges so I could connect and un-connect the pieces easily when setting up the light.

That's a great idea!  I had been pondering something exactly the same for us - something to put light over the kitchen independent of the awning.

I'll be borrowing a few ideas.  Never thought to use the qubelok stuff "modified" for quick release.
2017 Y62 Patrol
2009 Lifestyle Extenda

Offline Bird

  • Once Was Lost, now am found
  • Hard Top Camper User
  • ******
  • Posts: I am a geek!!
  • Thanked: 1874 times
  • Gender: Male
  • Life is far too long....
    • My Place.
Re: CT Kitchen Light - Show me yours.
« Reply #34 on: August 28, 2011, 10:41:13 PM »
That's a great idea!  I had been pondering something exactly the same for us - something to put light over the kitchen independent of the awning.

I'll be borrowing a few ideas.  Never thought to use the qubelok stuff "modified" for quick release.
I might try and use the bolt holes on the rear tailgate where the spare tyre would mount
-
Click to enlarge

Gone to a new home

Offline Dion

  • Hard Floor Camper User
  • *****
  • Posts: 1385
  • Thanked: 4 times
  • Gender: Male
Re: CT Kitchen Light - Show me yours.
« Reply #35 on: August 28, 2011, 10:52:24 PM »
I might try and use the bolt holes on the rear tailgate where the spare tyre would mount

Yeah I have my spare there, I was toying with a few ideas but I was thinking of mounting the filed down t-piece on the LHS of the kitchen (on the flat bit that folds inward) as there's a small gap there when closed, then just have the light from there.  Would put more strain on the mount as the light wouldn't be a 'tee' like Sams, but rather a big right angle (to have the light parallel with the kitchen) so more angular force on it.  But I could brace the vertical pole against the side of the kitchen  box with a spacer, so that the filed down t-piece wouldn't be taking so much lateral strain (i.e. have the vertical support for the light resting against the side of the kitchen box).
2017 Y62 Patrol
2009 Lifestyle Extenda

Offline hookedon4wding

  • Hard Floor Camper User
  • *****
  • Posts: 819
  • Thanked: 3 times
  • Gender: Male
    • My Videos
Re: CT Kitchen Light - Show me yours.
« Reply #36 on: August 29, 2011, 11:52:15 AM »
Just applying for some design patents now. Better get in quick before they're approved  :cheers:

Offline Bird

  • Once Was Lost, now am found
  • Hard Top Camper User
  • ******
  • Posts: I am a geek!!
  • Thanked: 1874 times
  • Gender: Male
  • Life is far too long....
    • My Place.
Re: CT Kitchen Light - Show me yours.
« Reply #37 on: August 29, 2011, 12:06:51 PM »
Quote from: hookedon4wding
Just applying for some design patents now. Better get in quick before they're approved  :cheers:


-
Click to enlarge

Gone to a new home

Offline Bird

  • Once Was Lost, now am found
  • Hard Top Camper User
  • ******
  • Posts: I am a geek!!
  • Thanked: 1874 times
  • Gender: Male
  • Life is far too long....
    • My Place.
Re: CT Kitchen Light - Show me yours.
« Reply #38 on: August 29, 2011, 02:26:31 PM »
Just went to bunnings and bought the gear to make mine - infact its all clipped together already, just need couple of 'grommets', and its done

cost so far $45 inc a new hacksaw + blades to cut it down.
-
Click to enlarge

Gone to a new home

Offline hookedon4wding

  • Hard Floor Camper User
  • *****
  • Posts: 819
  • Thanked: 3 times
  • Gender: Male
    • My Videos
Re: CT Kitchen Light - Show me yours.
« Reply #39 on: August 29, 2011, 02:37:52 PM »
Just went to bunnings and bought the gear to make mine - infact its all clipped together already, just need couple of 'grommets', and its done

cost so far $45 inc a new hacksaw + blades to cut it down.

Good to see I've inspired someone. Looking forward to seeing some photos of the finished product. Just make sure it doesn't look better than mine  ;D

Offline Bird

  • Once Was Lost, now am found
  • Hard Top Camper User
  • ******
  • Posts: I am a geek!!
  • Thanked: 1874 times
  • Gender: Male
  • Life is far too long....
    • My Place.
Re: CT Kitchen Light - Show me yours.
« Reply #40 on: August 29, 2011, 02:47:44 PM »
Good to see I've inspired someone. Looking forward to seeing some photos of the finished product. Just make sure it doesn't look better than mine  ;D
what sort of LED"s - 5050's? the 60per mtr ones?

also thought about a couple of hooks on it to hang things on.. not sure what yet ;) :) :)
« Last Edit: August 29, 2011, 02:53:07 PM by Lost »
-
Click to enlarge

Gone to a new home

Offline hookedon4wding

  • Hard Floor Camper User
  • *****
  • Posts: 819
  • Thanked: 3 times
  • Gender: Male
    • My Videos
Re: CT Kitchen Light - Show me yours.
« Reply #41 on: August 29, 2011, 02:55:00 PM »
I used the 5050's but went for the 30 per meter version as I mainly wanted them to make some reading lights inside the camper and didn't want them too bright. Also wanted to keep the amp draw to a minimum.

Offline Kangaron

  • "Don't make excuses, Make it Happen."
  • Hard Top Camper User
  • ******
  • Posts: 1878
  • Thanked: 119 times
  • Gender: Male
Re: CT Kitchen Light - Show me yours.
« Reply #42 on: August 29, 2011, 07:58:25 PM »
Due to being time poor I took the easy way out with a Korr kit.

Offline mystq

  • Hard Floor Camper User
  • *****
  • Posts: 1294
  • Gender: Male
Re: CT Kitchen Light - Show me yours.
« Reply #43 on: August 29, 2011, 08:00:48 PM »
Due to being time poor I took the easy way out with a Korr kit.


I got one to with my Tambo, great piece of kit.
Eat Sleep Camp Repeat

Offline Bird

  • Once Was Lost, now am found
  • Hard Top Camper User
  • ******
  • Posts: I am a geek!!
  • Thanked: 1874 times
  • Gender: Male
  • Life is far too long....
    • My Place.
Re: CT Kitchen Light - Show me yours.
« Reply #44 on: August 29, 2011, 08:59:33 PM »
Quote from: hookedon4wding
Also wanted to keep the amp draw to a minimum.
Yea I'll figure out how to work that out one day :(

All cut to size, LED's in position... Forgot the farquin bolts to hold the base mount to the trailer didnt I....

Total time to assemble - 10 minutes. Would have been less if I didnt have to cut the upright shorter.

Will let you know the result when I get the new battery box fitted on weekend..
-
Click to enlarge

Gone to a new home

Offline Prado Guy

  • Tent User
  • ***
  • Posts: 146
  • Gender: Male
  • Don't you just love a good campfire....
Re: CT Kitchen Light - Show me yours.
« Reply #45 on: September 14, 2011, 08:29:25 PM »
Sam, what a top class effort!!  :cup:

We are getting our new CT this weekend and I already have a ton of ideas. This is now another one that I may have to "borrow".

What a PITA I have to work all next week instead having some fun in the shed....

Offline Bird

  • Once Was Lost, now am found
  • Hard Top Camper User
  • ******
  • Posts: I am a geek!!
  • Thanked: 1874 times
  • Gender: Male
  • Life is far too long....
    • My Place.
Re: CT Kitchen Light - Show me yours.
« Reply #46 on: September 14, 2011, 08:54:19 PM »
Quote from: Lost
Will let you know the result when I get the new battery box fitted on weekend..
Make that this weekend :)
-
Click to enlarge

Gone to a new home

Offline Bird

  • Once Was Lost, now am found
  • Hard Top Camper User
  • ******
  • Posts: I am a geek!!
  • Thanked: 1874 times
  • Gender: Male
  • Life is far too long....
    • My Place.
Re: CT Kitchen Light - Show me yours.
« Reply #47 on: May 02, 2014, 02:24:08 PM »
Here's my effort.

I've been meaning to fab up a light for the kitchen that we can use with or without the awning up for a while now and finally got a chance to do something about it this weekend.

Main components are led strip lights, square section aluminium from Bunnings with a range of joiners (T's , right angles etc) and a water proof switch.

I wanted it to be easy to setup and free standing. First step was to bolt a T joiner to the back edge of the kitchen. These T joiners are made for permanent connection, which I didn't want at this particular join so I filed down the ridges so I could connect and un-connect the pieces easily when setting up the light.


The holes in the top were just so I could get the screw driver through to the bolt head inside the T piece.


Next was to make up the upright with a short return piece at the top to get the light out over the centre of the stove and bench. The upright slides over the T piece I bolted to the back of the kitchen.


It's just 2 pieces of the aluminium square section joined with a right angle joiner. This bit I wanted to be a permanent join so didn't file the ridges off.


Next was to make up the light bar to attach to the upright. I made this from 2 piece of aluminium square section joined by a T joiner. This means it just slots straight into the upright (again, I filed the ridges down on this connection).


The led strip is stuck to the bottom and wiring runs through a grommet in the end, joins onto a 5m cable, comes out through another grommet in the centre of the bar, through a water proof switch and to a 12v cig plug.


So, the whole thing is just two parts. The light bar, and the upright. The upright slots into the T on the back of the kitchen and the light bar slots into the upright. 15 seconds max to set it up. We'll keep the 2 pieces next to the mattress on the bed base ready to plug in when we setup.


Provides heaps of light right where we need it and doesn't rely on the awning or any poles! Very happy with the end result.

Cheers, Sam.
BTT for a top idea.
-
Click to enlarge

Gone to a new home

Marschy

  • Guest
Re: CT Kitchen Light - Show me yours.
« Reply #48 on: May 02, 2014, 03:51:37 PM »
Here's my effort.

A fold down marine anchor light.


Offline shakey55

  • Soft Floor Camper User
  • ****
  • Posts: 399
  • Thanked: 14 times
Re: CT Kitchen Light - Show me yours.
« Reply #49 on: May 02, 2014, 04:31:39 PM »
I bought a KORR LIGHTING kit.  Cost a few bucks, but I can tell you it is the best thing I have added to my CT.


Sent from my iPad using Tapatalk